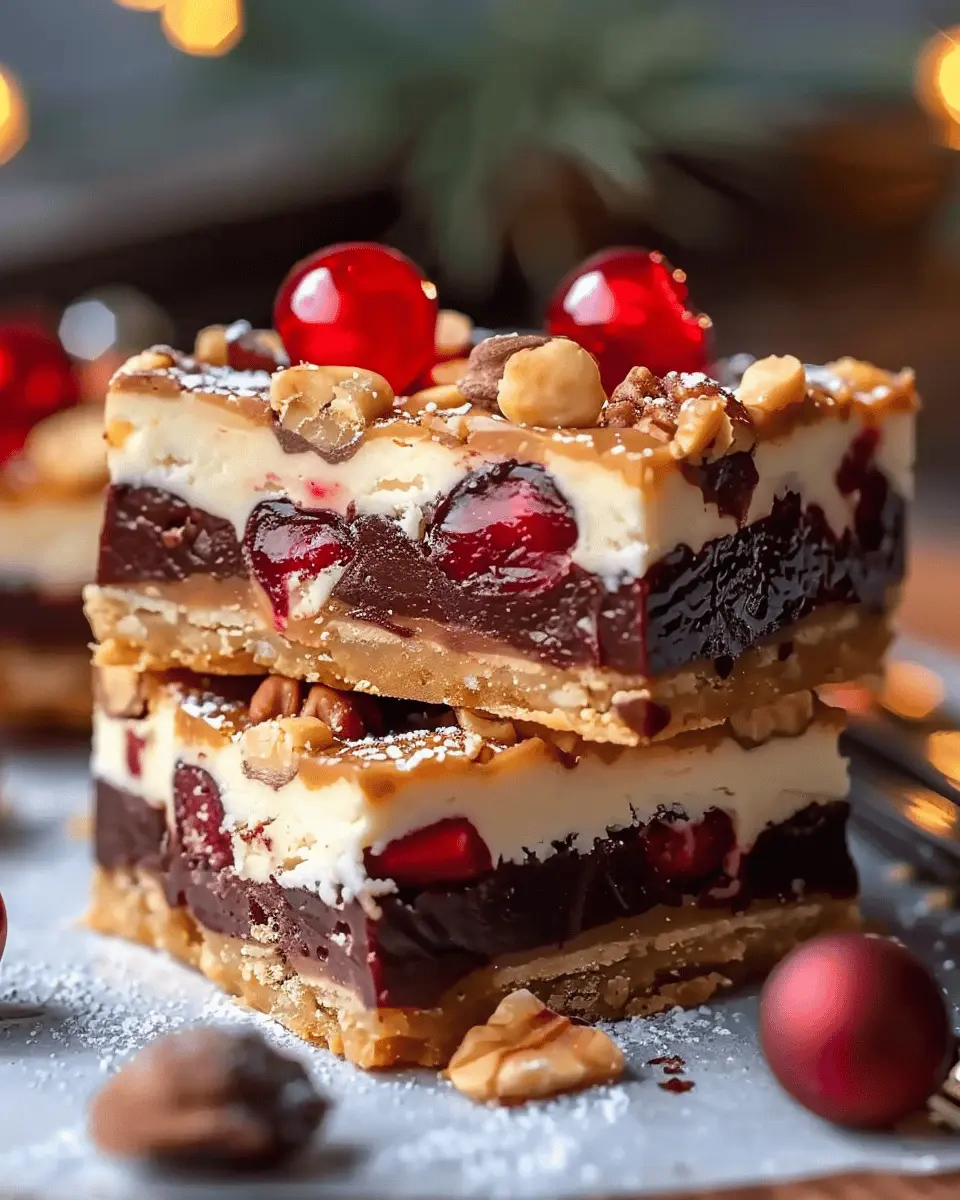
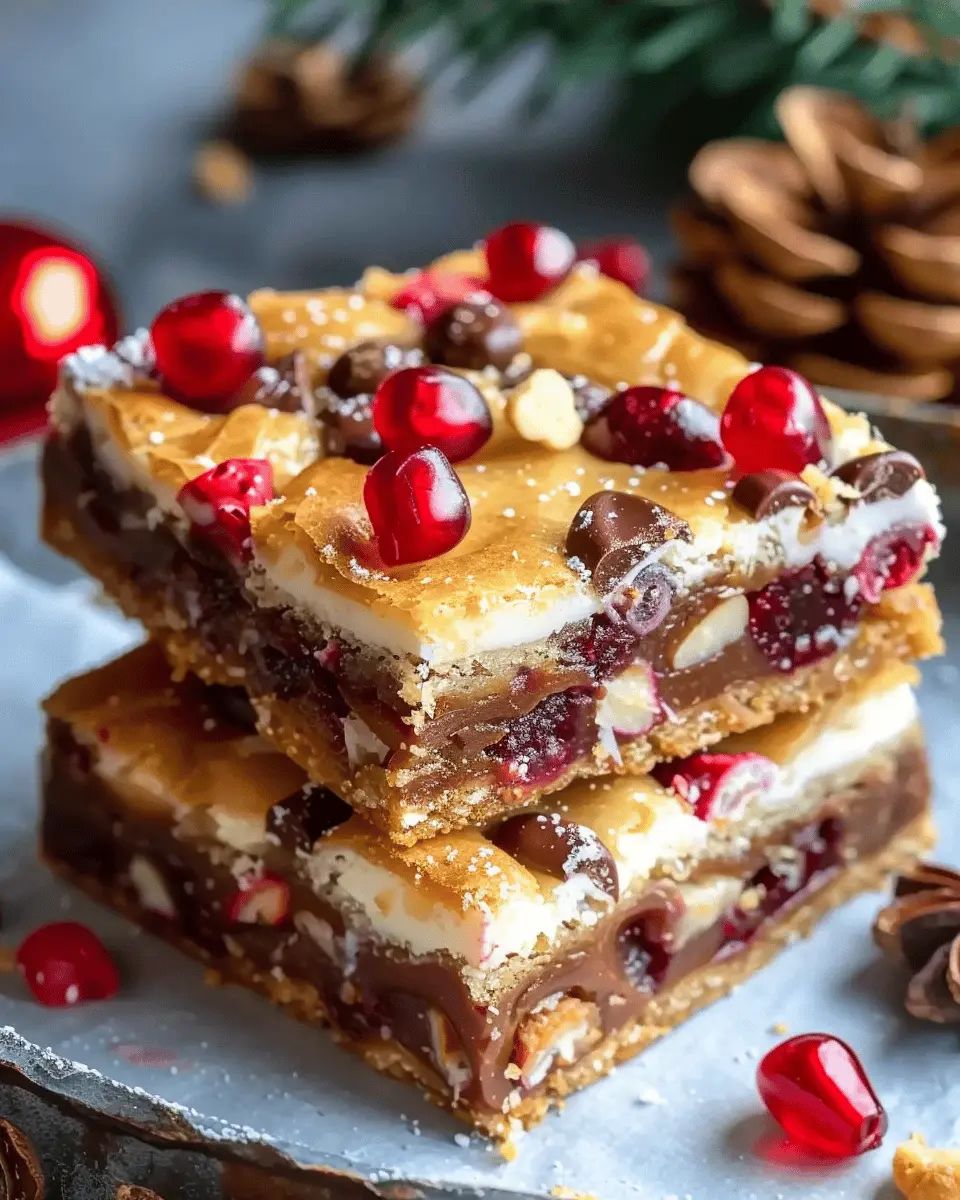
Introduction to Christmas Bars
When the holiday season rolls around, Christmas bars emerge as a delightful alternative to cakes and cookies, capturing the festive spirit in bite-sized treats. But what exactly are these charming bars? Picture a rich and chewy dessert, often layered with simple yet tantalizing flavors that evoke memories of warm gatherings and cherished traditions. These bars typically consist of a crumbly base, a flavorful filling, and a sumptuous topping, making them an irresistible choice for both baking novices and seasoned pros.
One of the reasons Christmas bars stand out is their versatility. From peppermint chocolate to gingerbread and cranberry almond, there’s a flavor to suit every palate. Moreover, they are a dream come true for busy hosts during the holidays. Imagine baking a huge batch of appealing treats without the fuss of individual cookies. You can slice them into perfect squares or rectangles, making them easy to share at holiday parties, potlucks, or simply for cozy nights at home with family.
In fact, an interesting study by the American Institute for Cancer Research noted that sharing food during social gatherings can strengthen relationships, making Christmas bars not only delicious but also a means of fostering connection. As you prepare your festive baking lists, consider featuring these bars; they’ll be a hit for sure!
Baking can also be a therapeutic way to unwind amidst holiday chaos. It creates a space for creativity, whether you’re experimenting with sprinkles for decoration or incorporating your family’s secret spice blend into your filling. Plus, the heavenly aroma of baking cookies filling your kitchen is an experience in itself.
Ready to add some Christmas bars to your holiday lineup? This guide will lead you through their delightful variations, step-by-step instructions, and tips to make your baking experience enjoyable. Let’s embark on this sweet journey together, one layer at a time!
For more baking inspiration, check out Food52 and BBC Good Food for seasonal recipes that can elevate your holiday dessert table.
Ingredients for Christmas Bars
Essential ingredients for the perfect Christmas Bars
With the holiday season upon us, it’s the perfect time to whip up some delightful Christmas bars. Delightfully festive and easy to make, the key to these treats is in the ingredients.
To start, gather these essentials:
- Oats: A hearty base that provides texture and wholesomeness.
- Butter: Adds richness and binds everything together beautifully.
- Nut Butters: Choose your favorite, whether almond or peanut; they add creaminess and flavor.
- Sweetener: You can go with honey, maple syrup, or brown sugar, depending on your preference. Learn more about natural sweeteners here.
- Dried Fruits: Think cranberries or apricots for that festive touch.
- Chocolate Chips: A must for a sweet finish, whether dark or milk.
- Nuts: Walnuts or almonds give a nice crunch and health benefits.
These ingredients work together to create a Christmas bar that encapsulates the joy and flavor of the holiday season. Don’t be afraid to mix and match based on personal preferences; that’s where the magic happens!
Ready to dive into holiday baking? Let’s make these bars a centerpiece of your festive gatherings!
Step-by-step Preparation of Christmas Bars
The festive season is here, and what better way to celebrate than by baking a batch of delicious Christmas bars? These sweet treats are perfect for sharing with family and friends, providing a delightful blend of flavors that resonate with holiday cheer. Let’s dive into the step-by-step preparation to ensure your bars come out perfect every time.
Preheat the Oven
Before you begin mixing your ingredients, preheating your oven is a crucial first step. Set it to 350°F (175°C). Preheating ensures that your Christmas bars bake evenly, achieving that golden-brown perfection we’re all after. If you’re like me, multitasking in the kitchen can save you time. While the oven preheats, you can start measuring out your dry ingredients. It’s a great way to maximize your efficiency!
Mix Dry Ingredients
In a large mixing bowl, combine all your dry ingredients. For a classic Christmas bars recipe, you’ll typically need:
- All-purpose flour
- Baking powder
- A pinch of salt
- Your choice of spices (cinnamon, nutmeg, or ginger work wonderfully)
Whisk them together until they are evenly mixed. This step is essential because it ensures there are no clumps and that the flavors are well distributed throughout your mix. If you’re interested in learning about the science of baking, this article on King Arthur Baking offers great insights into how these ingredients work together!
Add Wet Ingredients
Next, it’s time to bring in the wet ingredients. In a separate bowl, you’ll want to cream together:
- Butter (softened)
- Brown sugar
- Granulated sugar
- Eggs
- A splash of vanilla extract
- Milk (or a non-dairy alternative if you prefer)
Beat these ingredients until they are light and fluffy. This process introduces air into your mixture, giving your Christmas bars that delightful light texture. Once combined, gently add the wet ingredients to the bowl of dry ingredients. Mix just until combined—overmixing can lead to dense bars, which is not what you want.
Fold in Mix-ins
Ready for the fun part? Folding in your mix-ins is where you can really make these Christmas bars your own. You can add a variety of tasty ingredients, such as:
- Semi-sweet chocolate chips
- Dried fruits (like cranberries or apricots)
- Chopped nuts
- Toasted coconut
Gently fold these into the batter using a spatula. Be careful not to overwork the mixture; you still want to maintain that lovely texture.
Spread and Bake
With your mixture ready, it’s time to spread it into a greased or lined baking pan. Aim for an even layer to ensure consistent baking. Put it in the preheated oven and bake for about 25-30 minutes, or until the top is lightly golden and a toothpick inserted in the center comes out clean. The aroma wafting through your kitchen will be enough to make anyone eager for a taste!
Cool and Cut
Once your Christmas bars are out of the oven, give them a little time to cool in the pan (about 10-15 minutes). This is a great opportunity to brew a cup of your favorite holiday tea or coffee—trust me, they pair beautifully! After they’ve cooled, transfer them to a wire rack to cool completely.
When everything is cool, use a sharp knife to cut them into squares or rectangles according to your preference. You can even sprinkle some powdered sugar on top for a festive touch! These bars are perfect for gifting, sharing during gatherings, or simply enjoying with a cozy blanket and a movie.
By following these simple steps, you’ll have delightful Christmas bars that will surely satisfy everyone’s sweet tooth this season. Happy baking!
Variations on Christmas Bars
Christmas bars are incredibly versatile, making them a beloved treat during the holiday season. Let’s explore some delightful variations that cater to different dietary preferences and flavor profiles.
Mint Chocolate Christmas Bars
If you’re a fan of the classic peppermint patty, these mint chocolate Christmas bars will be your new favorite. Start with a rich chocolate base, and add crushed peppermint candies or extract for that refreshing minty kick. Top them off with a smooth layer of chocolate ganache and a sprinkle of crushed candy canes for a festive touch. These bars are perfect for sharing at holiday parties, and the vibrant green and red colors scream Christmas!
Gluten-Free Christmas Bars
Hosting guests with dietary restrictions? Fear not! These gluten-free Christmas bars can easily be made using almond flour or a gluten-free flour blend. Combine coconut oil, organic sugars, and your choice of festive spices to create a chewy and decadent dessert that everyone will enjoy. Don’t forget to check out resources like the Gluten Intolerance Group for more tips on gluten-free baking.
Vegan Christmas Bars
Going plant-based doesn’t mean skimping on festive flavors. Vegan Christmas bars can be crafted with simple ingredients like oats, nut butter, and pure maple syrup. Opt for dairy-free chocolate chips and mix in your favorite nuts and fruits to create a wholesome yet indulgent treat. This easy recipe lets you whip them up in just a few minutes!
Fruit and Nut Medley Christmas Bars
For a healthier twist, consider fruit and nut medley Christmas bars. Use a combination of dried fruits like cranberries and apricots, mixed with assorted nuts for crunch. Add a drizzle of honey or agave syrup to bind it all together. These bars make a great energy booster during the busy holiday season and are a delightful addition to your snack table.
Whichever variation you choose, Christmas bars are sure to brighten up your festivities!
Cooking Tips and Notes for Christmas Bars
Best practices for a successful bake
When preparing your Christmas bars, start by checking your ingredients. Using fresh, high-quality items like butter and chocolate can elevate the flavors. Make sure to measure accurately—too much flour can lead to dry bars.
Preheat your oven ahead of time to ensure even baking. It’s also wise to line your baking dish with parchment paper; this helps with easy removal and cleanup afterward.
Common mistakes to avoid
One frequent misstep is opening the oven door too early; this can cause your bars to collapse. Trust the baking time suggested in the recipe, and perform the toothpick test for doneness.
Another tip? Don’t skip cooling entirely before slicing!* Christmas bars* are best when allowed to cool completely in the pan, giving them time to set properly. This makes cutting them easier and ensures beautiful, clean edges.
For more baking insight, check out resources from the American Baking Guild or King Arthur Baking. Happy baking!

Serving Suggestions for Christmas Bars
Delightful pairings with festive beverages
When serving your Christmas bars, consider pairing them with warm, festive beverages for a delightful experience. A steaming cup of cinnamon-spiced hot chocolate or creamy eggnog can beautifully complement the rich flavors of your bars. If you enjoy tea, a berry-infused herbal blend offers a refreshing contrast. The balance of sweetness from your bars against these beverages creates a cozy, holiday vibe that everyone will love!
For a bubbly twist, consider a homemade ginger ale or sparkling cranberry drink, adding a touch of fizz to your festivities. You can find some excellent non-alcoholic beverage recipes on popular culinary sites like Food Network and BBC Good Food.
Presentation ideas for holiday gatherings
Want to impress your guests? Present your Christmas bars in a festive way! Use colorful holiday platters or tiered cake stands to create a visually appealing display. Consider garnishing with fresh cranberries or sprigs of mint for that seasonal touch. Mini boxes or clear bags tied with a ribbon also make charming take-home treats for your guests.
With just a little creativity, your Christmas bars can become the star of your holiday gathering, inviting everyone to indulge in sweetness and cheer.
Time Breakdown for Christmas Bars
Preparation Time
Getting started on your Christmas bars is a breeze! You’ll need around 15 to 20 minutes for prep. During this time, gather all your ingredients, chop any nuts or fruits, and line your baking pan. Don’t forget to preheat your oven to ensure it’s hot and ready when you’re done with the prep.
Baking Time
Next comes the baking! Your Christmas bars will need about 25 to 30 minutes in the oven. Keep an eye on them as they bake—the smell of vanilla and spices wafting through your kitchen will be irresistible!
Total Time
In total, you’re looking at roughly 45 to 50 minutes from start to finish. That means more time for holiday festivities! Once cooled, you can slice and serve these delicious treats to friends and family.
If you’re looking for some inspiration while you bake, check out this guide on holiday baking for some great tips!
Nutritional Facts for Christmas Bars
When indulging in delicious Christmas bars, it’s essential to know what’s in them. While these treats are festive and delightful, they come with their nutritional stats.
Calories
On average, a typical serving of Christmas bars contains around 200-250 calories. This can vary based on the ingredients used, so be mindful if you’re watching your caloric intake. You can find ways to lower calories by incorporating healthier substitutes like coconut flour or almond butter.
Protein
These festive treats generally offer a modest protein punch, with about 3-5 grams per serving. To boost the protein content, consider adding some nuts or protein powder. Not only does this enhance nutrition, but it also adds a satisfying crunch to your Christmas bars!
Sugar Content
The sugar in Christmas bars can range between 10-15 grams, depending heavily on the sweetness of your chosen ingredients. If you’re looking to cut down on sugar, try using natural sweeteners like honey or maple syrup. Discover more on healthy sugar substitutes here.
Remember, enjoying Christmas bars doesn’t mean compromising on your health. With a bit of creativity, you can make these festive treats both delicious and nutritious!
FAQs about Christmas Bars
How can I make my Christmas Bars more festive?
Elevate your Christmas Bars with a touch of creativity! Here are some fun ideas to consider:
- Add seasonal spices: Think cinnamon, nutmeg, or ginger for that extra holiday warmth.
- Colorful toppings: Use festive sprinkles, cranberries, or chopped nuts to enhance the visual appeal.
- Decorative icing: Drizzle melted white chocolate or royal icing over the top for a beautiful finish.
Personalize your bars with family favorites—everyone will appreciate that special touch!
What’s the best way to store leftover Christmas Bars?
To keep your delightful Christmas Bars fresh, follow these storage tips:
- Airtight containers: Place bars in a sealed container at room temperature if you plan to eat them within a week. Be sure to separate layers with parchment paper to prevent sticking.
- Refrigeration: If you want them to last longer, refrigerate in an airtight container for up to two weeks. Just remember to bring them to room temperature before serving for the best flavor.
- Freezing: You can freeze them for up to three months. Wrap each bar in plastic wrap and place them in a freezer-safe container.
For longer-term storage, check out this guide on how to store homemade bars safely.
Can I make Christmas Bars ahead of time?
Absolutely! Christmas Bars are perfect for making in advance. Feel free to prepare them a few days prior to your holiday gathering. Just remember:
- Cool and slice: Let them cool completely before slicing to prevent crumbling.
- Store properly: Follow the tips above for optimal freshness.
Preparing ahead of time means you can enjoy quality moments with your friends and family without the last-minute stress!
Conclusion on Christmas Bars
Why these bars are a must-try for the holiday season
As the holiday season approaches, there’s something undeniably special about indulging in Christmas bars. These delightful treats not only boast a variety of flavors that capture the essence of the festivities but also offer an easy, make-ahead option for your gatherings.
They’re perfect for sharing with family or as a sweet gift for neighbors. Plus, the versatility of Christmas bars means you can cater to different tastes, whether you prefer rich chocolate, tangy cranberries, or spicy ginger flavors.
Don’t miss out on these delicious bites that spread joy and flavor—try the easy recipes linked here for an unforgettable holiday season!
PrintChristmas bars: Indulgent Treats for a Joyful Holiday Season
Delight in the festive spirit with these indulgent Christmas bars that bring joy to your holiday celebrations.
- Prep Time: 15 minutes
- Cook Time: 30 minutes
- Total Time: 45 minutes
- Yield: 24 bars
- Category: dessert
- Method: baking
- Cuisine: American
- Diet: vegetarian
Ingredients
- 1 cup unsalted butter
- 2 cups granulated sugar
- 4 large eggs
- 3 cups all-purpose flour
- 1 teaspoon baking powder
- ½ teaspoon salt
- 2 teaspoons vanilla extract
- 1 cup chocolate chips
- ½ cup chopped nuts
Instructions
- Preheat your oven to 350°F (175°C) and grease a 9×13 inch baking pan.
- In a large bowl, cream together the butter and sugar until smooth.
- Beat in the eggs one at a time, then stir in the vanilla.
- Combine the flour, baking powder, and salt; gradually stir into the creamed mixture until just blended.
- Fold in chocolate chips and nuts.
- Spread the batter evenly into the prepared pan.
- Bake for 25-30 minutes in the preheated oven, or until a toothpick inserted in the center comes out clean.
- Let cool before cutting into squares.
Notes
- For an extra touch, drizzle melted chocolate on top of the bars before cutting.
Nutrition
- Serving Size: 1 bar
- Calories: 250
- Sugar: 20g
- Sodium: 150mg
- Fat: 12g
- Saturated Fat: 7g
- Unsaturated Fat: 4g
- Trans Fat: 0g
- Carbohydrates: 30g
- Fiber: 1g
- Protein: 3g
- Cholesterol: 80mg